Agents in Freshdesk can be 'Full-time' or 'Occasional'.
You can add full-time and occasional agents to your helpdesk and assign them scope and roles.
- You can restrict which parts of your helpdesk each of your agents can see and what actions they can perform.
Full-time agents are those in your core support team who will log in to your help desk every day.
Occasional agents are those who would only need to log in a few times every month, such as the CEO or your field staff. That way, people from other departments in your business like sales and marketing can log in and take care of specific customer queries from time to time, without you having to purchase an additional agent seat for a whole month.
You can add an unlimited number of Occasional Agents in your help desk no matter how many full-time agents you paid for when you picked a plan.
Each occasional agent will use up a Day Pass for every day that they log into your support portal. For example, if you have one day pass and an agent logs into the help desk at 8 in the morning, the day pass will be valid until the end of the day (00.00 hrs). The EOD will be calculated based on the time zone of the occasional agent if you are in the Garden plan or above. If you are in the Sprout or Blossom plan, the EOD will be based on the time zone of your helpdesk.
Please note that the time remaining in 24 hours will not be carried over to the next day. And an occasional agent will not be allowed to login when there are no day passes available. An occasional agent will work the same way as a full-time agent.
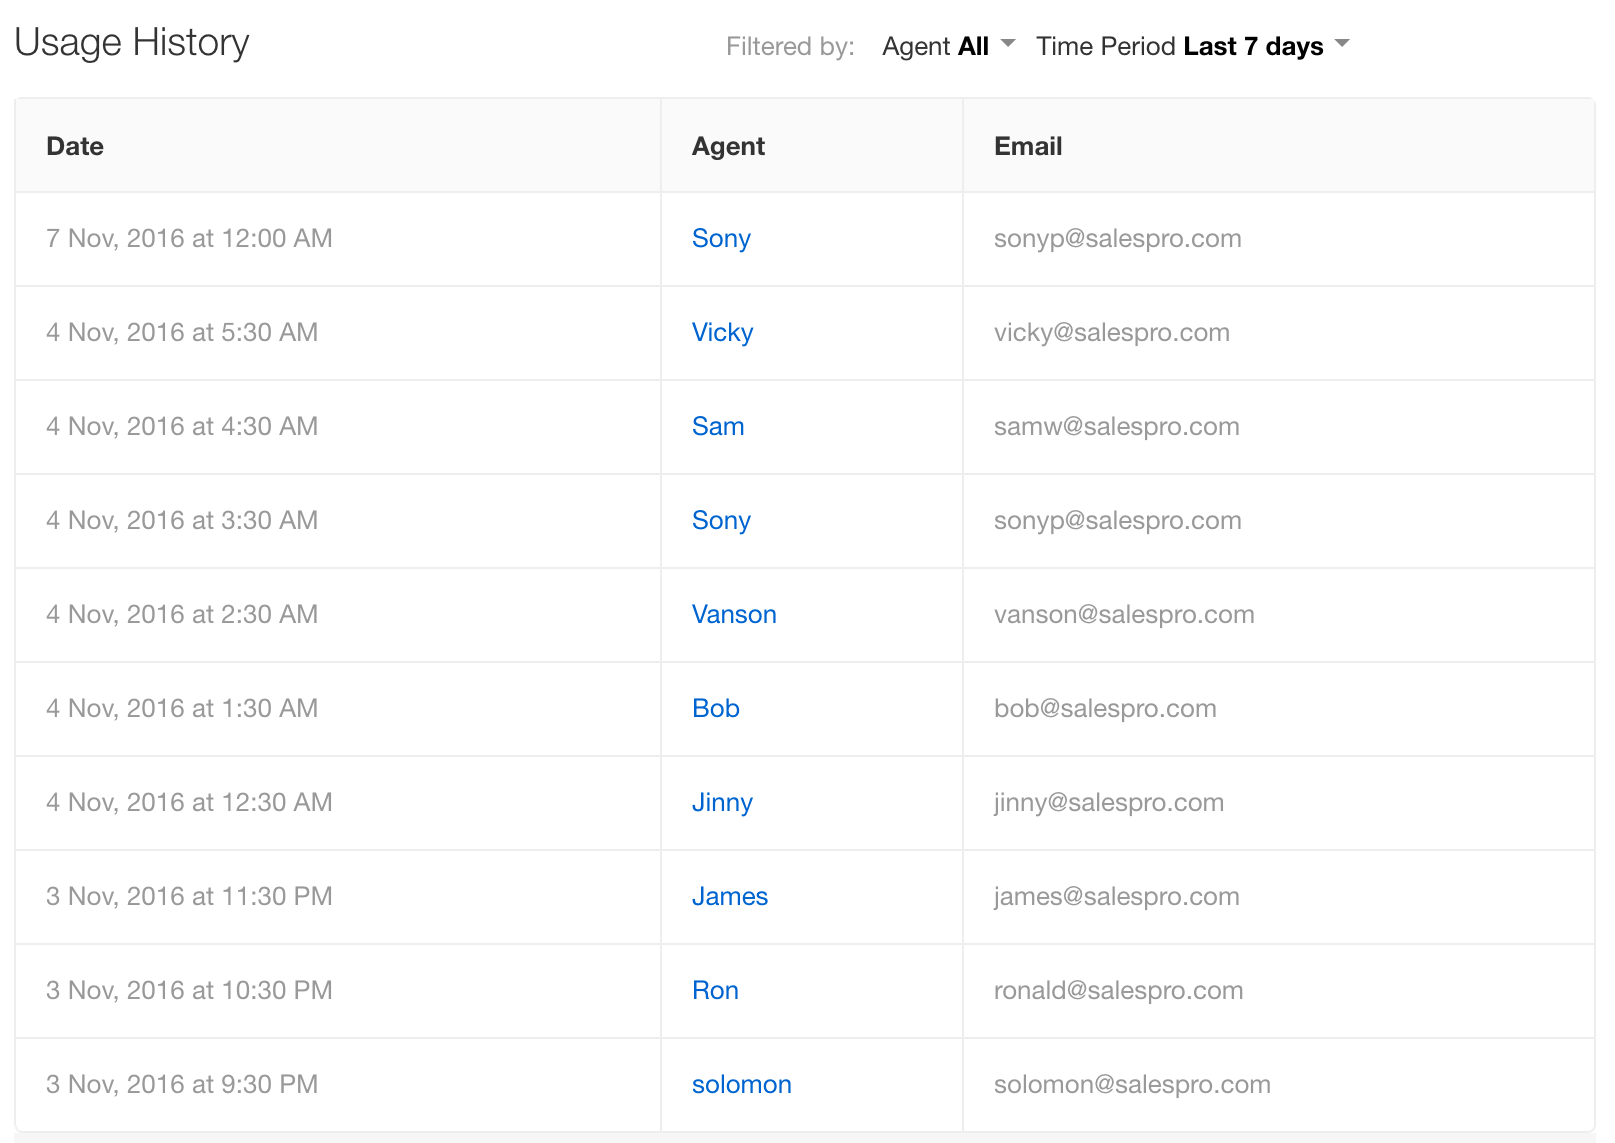
Usage History lets you keep a tab on occasional agents who use your purchased day passes by tracking the date, agent name, and email address. An admin can access it from Admin Tab > Account Settings > Day Passes. You can pull up usage history for the last 90 days and it also has a filter to narrow down your usage based on agent names as well.
You will get 3 free day passes per account initially, in every plan. For additional day passes, you'll have to pay $2 to $11 (depending on your plan). You can purchase Day Passes in bulk by logging in to your support portal as an account administrator and clicking on Admin > Day Pass.
Here are the prices for day passes:
| Plan | Price in AUD | Price in USD | Price in GBP | Price in EUR | Price in INR | Price in ZAR | Price in BRL |
| Blossom | $3 | $2 | £1.5 | €2 | ₹140 | R28 | R$8 |
| Garden | $4 | $3 | £2 | €3 | ₹210 | R42 | R$11 |
| Estate | $7 | $5 | £4 | €5 | ₹350 | R72 | R$19 |
| Forest | $15 | $11 | £8 | €11 | ₹790 | R156 | R$42 |
Article Source for Full Time and Occasional Agents: https://support.freshdesk.com/support/solutions/articles/37602
Adding new support agents
You can add full-time and occasional agents to your helpdesk and assign them scopes and roles. You can restrict which parts of your helpdesk each of your agents can see and what actions they can perform.
A quick guide to adding agents to Freshdesk:
- Login to your support portal as an Administrator
- Click on the Admin tab on the left panel > General Settings > Agents
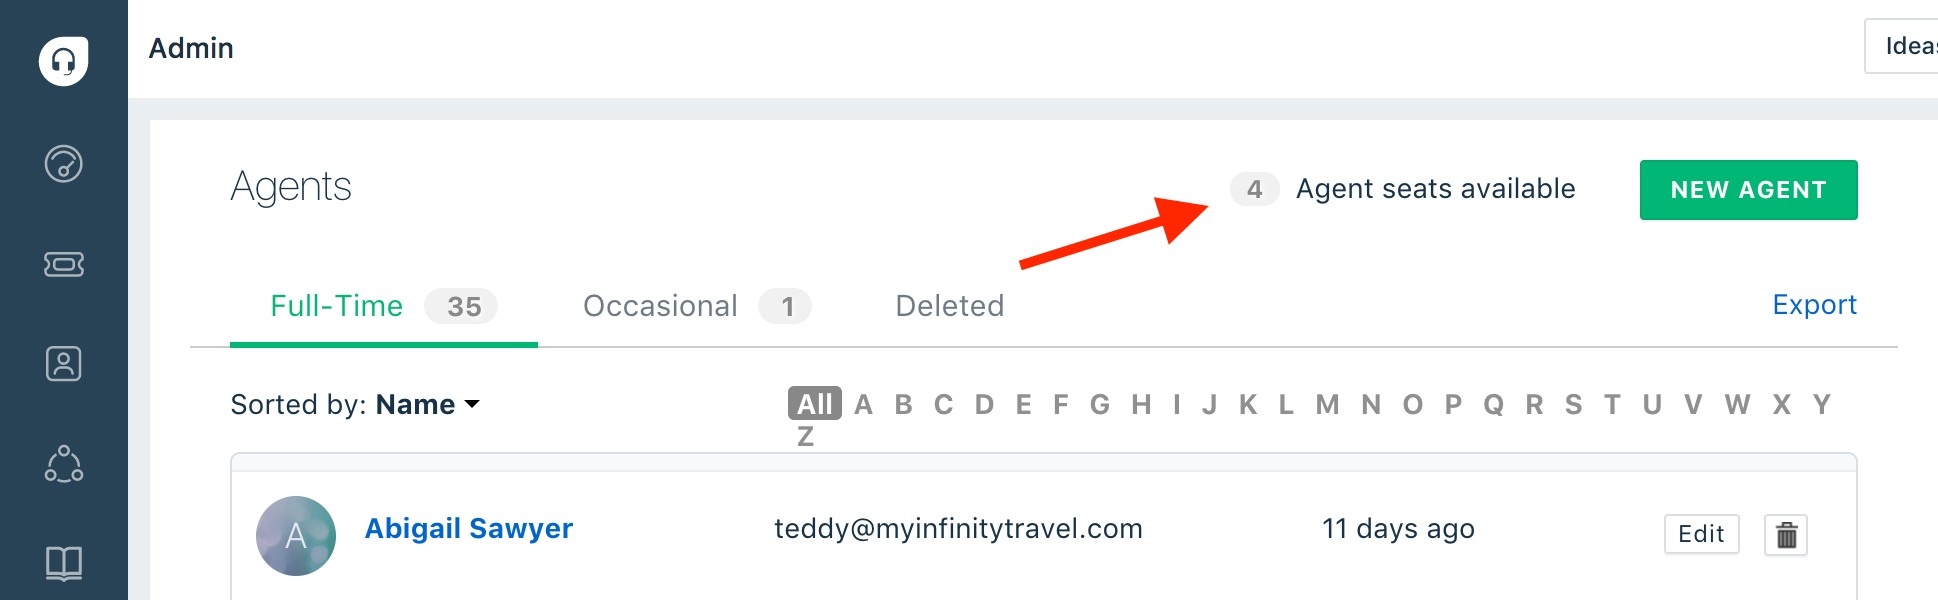
- The list of agents in your helpdesk is shown
- The number of agents seats still available in your helpdesk is shown on the top right corner. You can add more seats by visiting Admin > Account Settings > Plans & Billing
- To add a new agent, click the New Agent button in the top fold
- You can choose whether your new agent should be a full-time or an occasional agent using the radio button
- You will get 3 free day passes (as a whole, for an account) for occasional agent access. An occasional agent will use up a day pass every day he/she logs in. So with 3 passes, 3 occasional agents can each log in once or one agent can log in for 3 days. To add more day passes, click on 'Day Passes' under the Admin tab
Now let's try adding a full-time agent (the procedure is the same for occasional agents)
- Specify the email address of the agent under Email (required field)
- Once you enter the email address, the system will check if this is an existing user on your account. If so, you will be notified of the same. If the email address is new, you will get the option to enter further details - Full name, Work number, Mobile number and Title.
- You can add a profile picture for your agent, or it can be added later on by the agent after logging in

- If you want all your agents to use a standard signature, you can use the Signature box to fashion it. You can add pictures, links, and format the text completely, and you can copy the signature and paste in signature box of other agents too
Roles and scope
- The scope of an agent is what the agent will be able to see in the helpdesk. By default, the scope is Global (the agents can see everything in the helpdesk). You can also choose whether they should only be able to see tickets assigned to them (Restricted access) or see all tickets assigned to the Agent Group that they belong to (Group access)
- Every agent must have a role. A role defines what the agent can or cannot do within the helpdesk. For example, an 'Account Administrator' has complete control over the helpdesk, including payments while an 'Agent' can only perform actions on tickets such as replying and resolving. Learn more about roles and how they differ from scope

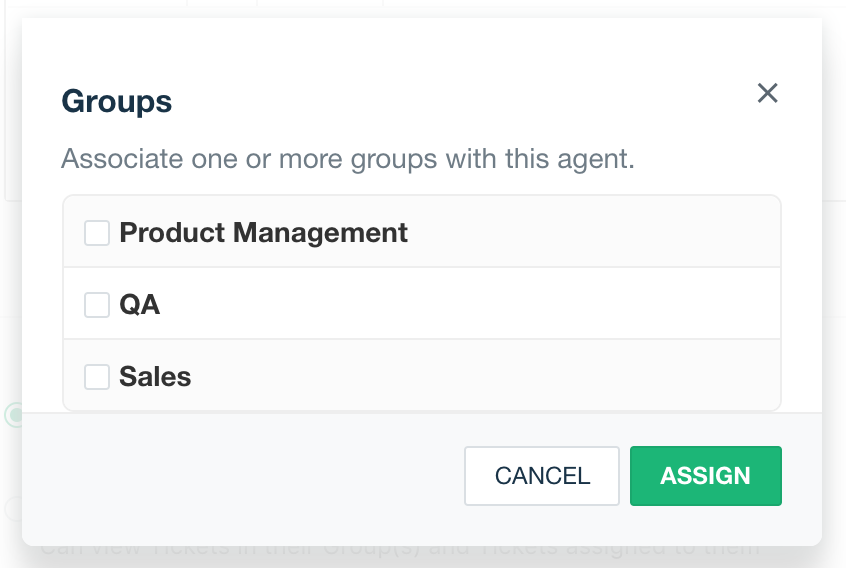
Associating groups to agents
- You can add agents to one or more groups when you are adding them to the helpdesk
- Click on the Associate Groups button to see the list of groups available and choose the groups to associate with your new agent
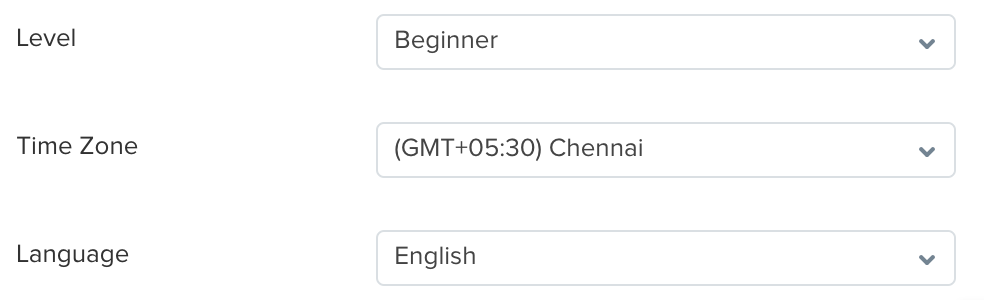
Language and time-zone options
- If you're on the Garden plan or above, you can set specific languages for agents. The agents will see the support portal in the language chosen.
- Additionally, on the Estate and Forest plans, you can set specific time zones (that take effect on their SLA policies) for each agent on your helpdesk.
- Levels will come in handy if you're on the Blossom plan or above and have the Arcade enabled. The level of an agent in Freshdesk Arcade is based on the points collected by the agent based on different metrics like fast responses and customer satisfaction ratings. You can start up your agent at different levels. Learn more about levels in Arcade.
- Click Save after you've entered all the necessary information.
- The agent receives an activation email through which the agent can log in and set the password.
- Back on the agents page, you can click on the Edit button next to each agent and make changes to their information.
- You can also delete agents by clicking on the Delete button. When an agent gets deleted, they will become a contact in your helpdesk.
- Once an agent has been deleted, tickets assigned to that particular agent will be unassigned.
'Existing Freshworks user' error
Sometimes when you try adding an agent you might receive an error message saying that the user already exists. This could be due to one of two reasons:
- The email address is already associated with an agent.
- The email address is associated with an existing or deleted 'Contact' in your helpdesk. In this case, you can just convert a contact into an agent by going to the Customers tab in Freshdesk, clicking on the contact name and choosing Convert to an Agent in the resulting screen.
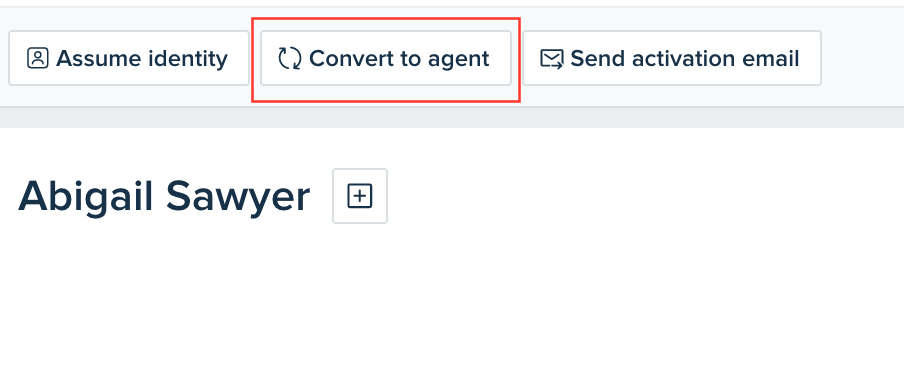
'Converting to agent will delete all the secondary emails of this contact' message
When you use the 'Convert to an Agent' option for a contact, you would be prompted with a pop-up message: 'Converting to agent will delete all the secondary emails of this contact. Proceed to convert?':

An agent can have only one email address associated with their agent profile. This message is to let you know that in case the contact has more than one e-mail address associated, the primary e-mail address will be taken as the agent's email address and the remaining email addresses (secondary email addresses) would be deleted.
Article Source: https://support.freshdesk.com/support/solutions/articles/37591-adding-new-support-agents-
Controlling agent access with roles
Roles allow you to create special privileges and profiles that specify what an agent can see and do within your Freshdesk support portal. These roles help you categorize your team into different sections, and assign them different capabilities so that they can do what they need to on their helpdesks without getting in each other's way.
Roles allow you to create special privileges and profiles that specify what an agent can see and do within your Freshdesk support portal. These roles help you categorize your team into different sections, and assign them different capabilities so that they can do what they need to on their helpdesks without getting in each other's way. They're especially useful for larger teams, where there are different groups of employees trying to handle different areas.
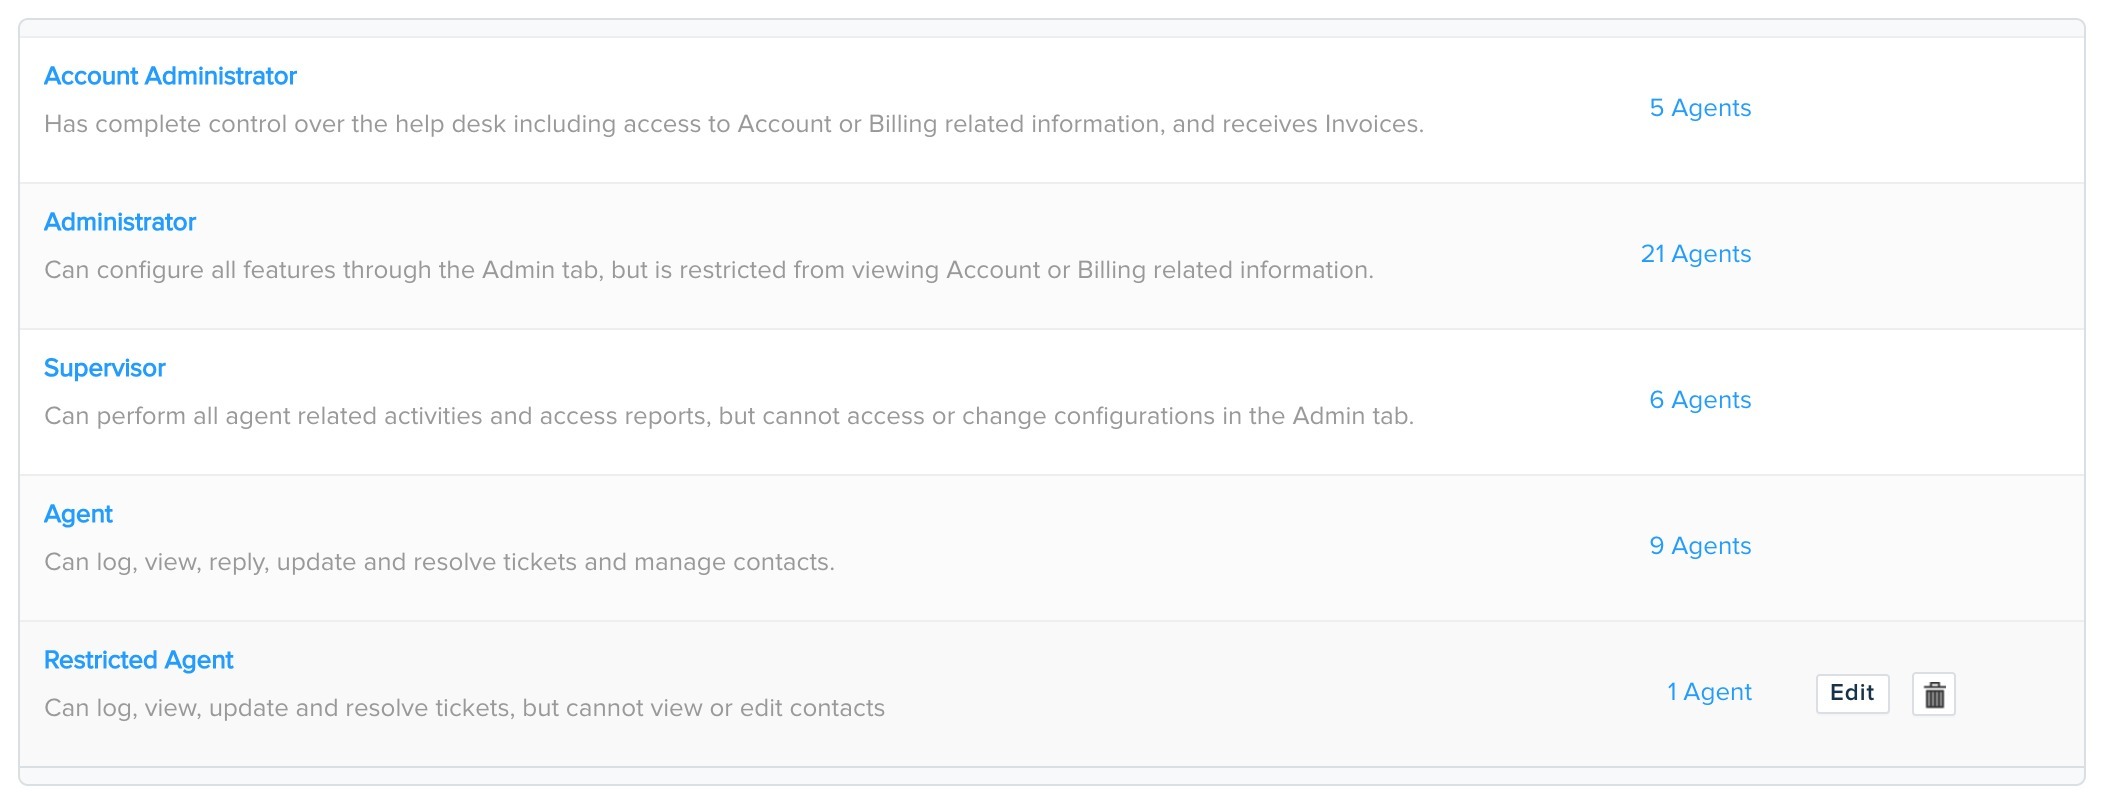
By default, Freshdesk lets you choose between 4 roles for your team members:
- Agents: Can view, respond to and assign tickets, as well as modify ticket properties.
- Supervisors: Can view and respond to tickets, generate reports and can also enable automatic ticket assignment of the member groups under the Admin tab.
- Admins: Can access everything and edit configurations under the Admin tab, but cannot view or modify billing information.
- Account Admins: Have complete access to everything, including billing and account management.
Note: The Restricted agent role in above image above is a custom role that you can create from the Estate onwards - learn more.
Each time you add a new agent to your helpdesk, you'll have to specify their role. Once you apply a role to an agent, the agent will no longer be able to view or access options or updates outside their role. For example, if an agent has the role of Agent, they won't be able to see the Admin tab.
If you assign multiple roles to an agent, the highest privileges allowed across these roles will apply. For example, if you have one role that gives a user access to your Community Forums and another that allows them to Reply to Tickets, a user with both roles will be able to access your community forums and reply to tickets.
How to assign a role to an agent
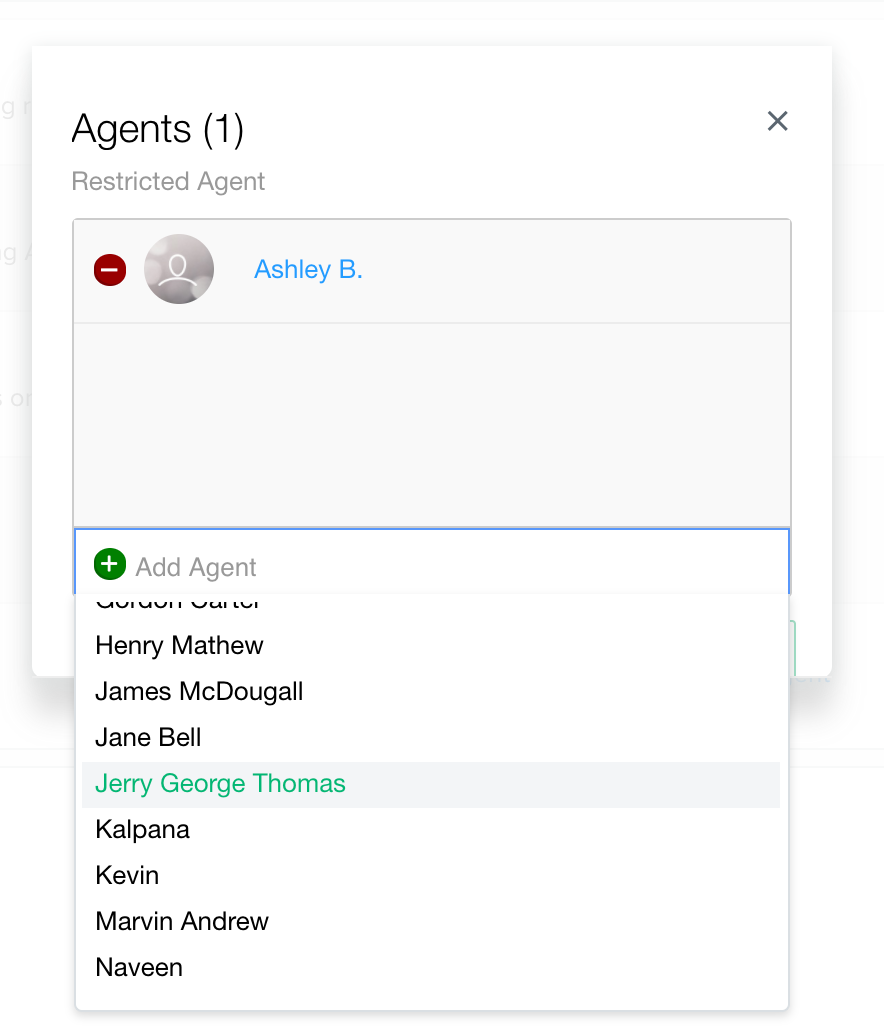
- Go to Admin > Roles.
- The number of agents belonging to each role will be displayed; just click on a role to add more agents to it.
Alternatively, you can assign roles when adding/editing an agent:
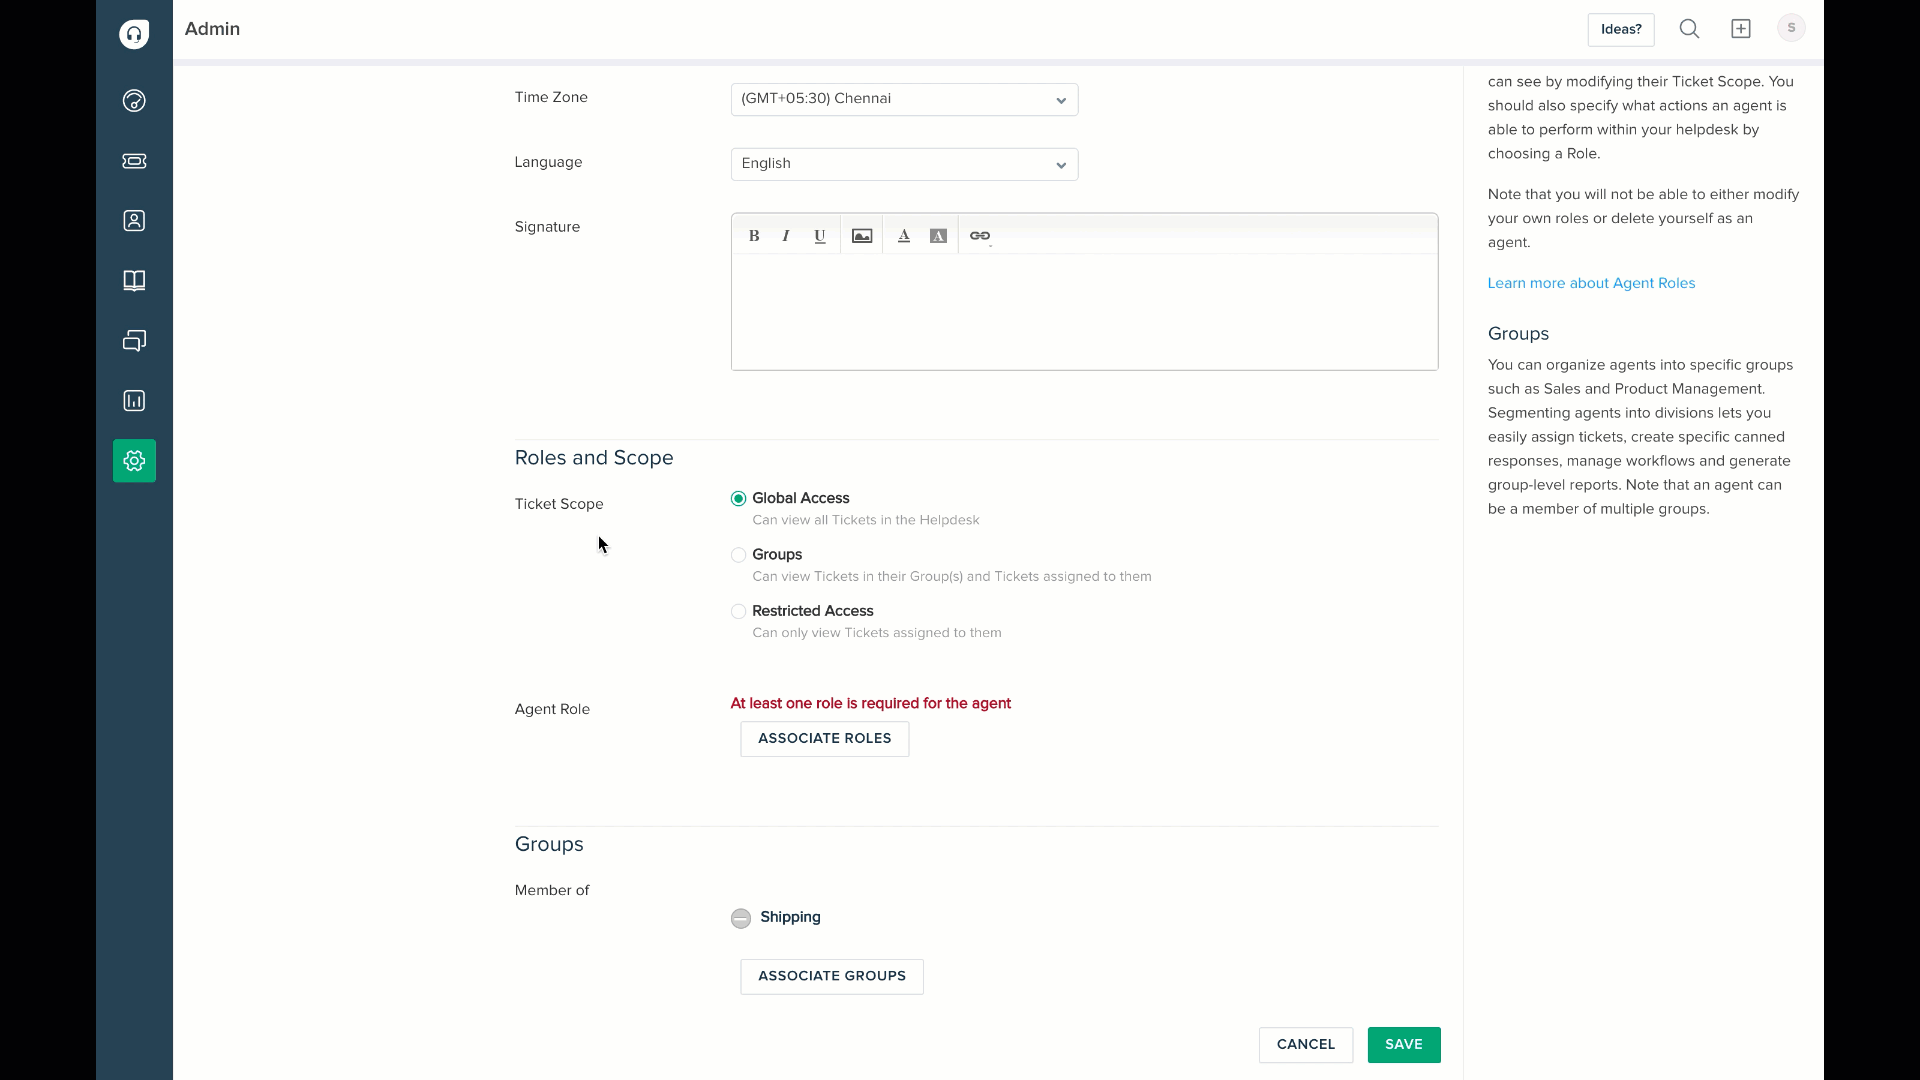
- Login to your helpdesk portal as an Admin.
- Go to Admin > Agent to add a new agent (or hover over an existing agent in your list and click Edit.)
- Scroll down to the Roles and Scope section, and click Associate roles.
- Check all roles that you want to assign to this agent.
- Click Save to save this agent’s roles.
When adding a role to a particular agent, remember to also set the scope of tickets that the agent can view. You can learn more about Roles and Ticket Scope below.
Ticket Scope vs. Agent Role - what’s the difference?
When you create a new agent or edit an existing one in Freshdesk, you have to define their role as well as the scope of tickets that they're allowed to see. To be clear, Ticket Scope and Agent Roles are two different things in Freshdesk, but they can be used together to achieve want you want in terms of access control and permissions.

Agent Role defines the kind of activities an agent is allowed to do in your helpdesk. This covers activities such as replying to tickets, adding notes and so on, but doesn't define the tickets that they'd be allowed to perform these activities on.
Note: It is mandatory to associate an agent with a role while creating a new agent in your helpdesk.
Ticket Scope, meanwhile, defines the level of access an agent has with respect to tickets in your helpdesk. You can choose between three levels of Scope: (a) Global, (b) Group-Level, and (c) Restricted.
Agents with Global Access can view all tickets across your helpdesk. Agents with Group and Restricted Access though, can only view tickets that have been assigned to them or a Group they belong to.
Please note that the Scope only controls what agents can view, not what they do - that is what the Roles are for. For example, you can assign roles to the agent to define whether they can reply to a ticket or forward a conversation, and then set their scope to specify which tickets they can actually view.
That means you can set the scope of an agent to just view tickets assigned to them, but give them complete control over all your configurations and setup. Or you can even create an agent with Global Access, allowing them to view everything coming into your support, but if you tighten the noose on their Roles, all they can do is add a private note to the ticket.